
Editing
Where things are
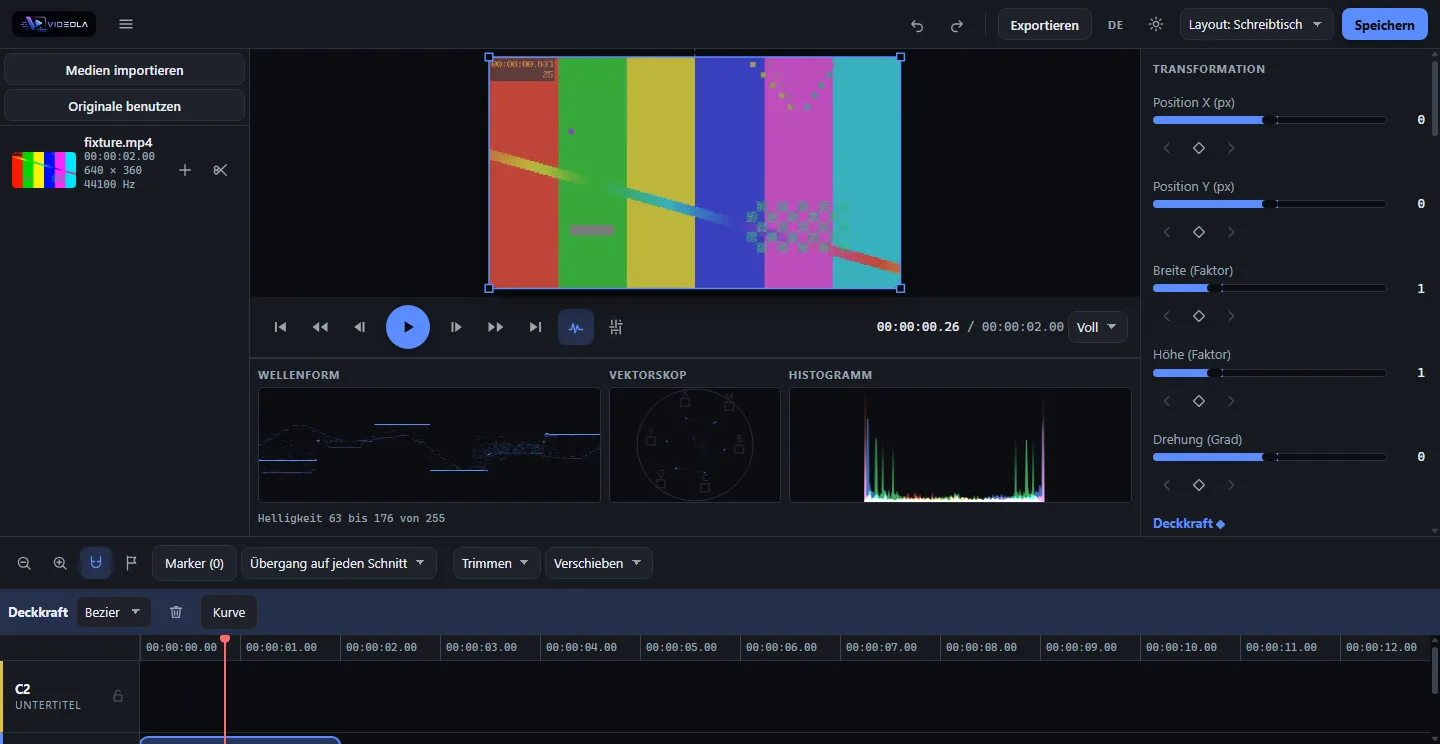
Six menus along the top: File, Edit, Insert, Project, View and Help — the names every editor uses, so "where is import" has the answer somebody already knows. Undo, redo, export and save sit on the bar itself, because those are reached for constantly and a menu is one click too many for them.
Over the middle of that bar stands the project's name and whether it holds the work — where a desktop editor puts a title bar, and quiet until there is something unwritten.
On a phone the same six become one disclosure with six groups inside it. Same tree, one level deeper, because six titles do not fit 390 px at a thumb's width each.
This page describes what the editing surface does today. Anything not listed here does not exist yet.
Getting media in
Two ways, both doing the same thing:
- Drag one or more files anywhere onto the window.
- Press Import media in the header.
The bytes are hashed with SHA-256 and written to OPFS under that hash before anything is dispatched, so a medium is on disk before the project refers to it. Importing the same file twice stores it once.
An import goes into the library and nowhere else. A medium reaches the timeline when somebody sends it there: the plus on its entry, a drag onto a track, or a track's own menu. Dropping ten files at once fills a shelf; it does not make ten clips to delete one by one.
The import dialogue closes as soon as something has arrived. The library fills up behind it, and a dialogue still standing there afterwards reads as "nothing happened" — which is how the same files were imported twice.
An untouched project adopts the format of its first medium, so a 640×360 clip does not sit as a small rectangle in the corner of a 1080p frame. Past that point the format is a decision somebody made, and Fit to frame in the inspector is how a later clip is brought up to it.
Pictures
PNG, JPEG, WebP, GIF, BMP and AVIF are media like any other: they go into the library, onto a track and through the export. A picture has no length to read off it, so it is given five seconds and the trim handles take it from there — and no frame rate at all, which is why a project whose first import is a logo keeps the format it had rather than adopting one nobody chose.
A still is decoded once. A watermark over a five minute video is one picture held for five minutes, not nine thousand decodes, and it is drawn through the same compositor as everything else: opacity, position, scale and every effect apply to it exactly as they do to a clip of footage. No proxy is ever made for one, because there is nothing to transcode.
The media library
Everything the project holds, with its length, its size in pixels and its sample rate. Add to timeline puts a medium behind whatever is already on the active track — and where none is active, or the active one does not take this material, behind whatever is on the first track of its kind. A medium can be placed as often as you like without importing it again, and a click on a track header decides which row it lands on.
Each entry carries a thumbnail decoded from the file itself, and audio clips draw their waveform from the buffers the graph already decoded — no second decode, and a reversed clip shows itself the way it plays.
When the bytes are gone
Media live in OPFS, which belongs to the browser and the origin, not to the project file. Open a project on another machine — or in another browser — and the library entries are there while their bytes are not. Such an entry is marked Data missing, cannot be placed on the timeline, and offers Relink.
Relinking asks for the file and checks it: the id of a medium is the SHA-256 of its content, so only the same file is accepted. Another file would be a different medium wearing this one's name, and every clip pointing at it would quietly show the wrong picture.
Proxies
Material taller than 720 pixels is transcoded once, in a worker of its own, into a smaller copy that the preview decodes instead of the original. The entry says Building proxy while that is happening and Proxy once it is there. One medium at a time: three at once would take three times as long to deliver the first, and the first is the one being waited for.
The copy is 720 pixels tall, H.264, with a key frame every second, and carries no sound. Each of those is one number rather than a preference:
| Choice | Why |
|---|---|
| 720 pixels tall | A decoded frame costs width × height × 4 bytes whatever the file was compressed to. The 256 MiB frame cache holds 8 frames of 4K, 32 of 1080p and 72 at 720p — so a step back finds the frame in memory instead of decoding a whole group of pictures again. |
| H.264 | The one codec with hardware decoding on every machine that runs a browser. A machine that cannot encode it simply gets no proxy. |
| A key frame every second | Playback restarts at the key frame before the instant asked for. A camera file with 250 frames between key frames costs 250 decodes for one step backwards; this costs at most a second's worth, whatever the camera did. |
| No audio track | Sound always comes from the original, decoding it was never the expensive part, and leaving it out makes the proxy quicker to build and smaller to keep. |
The frame rate and the length are deliberately untouched. A proxy on another timebase would put every source time the timeline hands out on the wrong picture.
The export never reads a proxy. Neither does a still, nor anything else that produces a file: what is written is decoded from the original at full resolution, whatever is on screen while you cut. That is checked on a real written file by ffprobe and ffmpeg, with a deliberately wrong proxy sitting on disk while the file is written.
A proxy is stored beside the original in OPFS, under the original's own content hash, and never enters the library: it has no media id, is never written into a .videola, and cannot be relinked to. A medium whose proxy is missing behaves exactly like one that never had a proxy — the original is decoded, and only the speed is gone.
Preview quality in the library toolbar is the choice between the two: Smooth (720p copies) decodes the proxies, Sharp (the original files) the material itself. It changes what is decoded, not what is displayed: every open decoder is closed and reopened on the file the choice now names. It never touches an export, which reads the originals whatever this is set to.
In and out points
The classical cut is three points: where the material starts, where it ends, and where on the timeline it goes. The scissors button beside a library entry arms that medium and opens the source bar under the transport.
| Key | Result |
|---|---|
| I | marks the in point at the source position |
| O | marks the out point there |
| , | inserts the marked range at the playhead |
| . | overwrites with it at the playhead |
The four keys listen on the window, like the transport's, so they work while the focus is in the timeline. All four have buttons beside them: a finger has no keyboard, and a range marked with the scrub bar and placed with two buttons is the same edit.
Nothing marked means the whole medium, which is what a clip nobody has trimmed yet is. An out point at or before the in point is not a range and the two buttons are disabled — the surface can see that, so it does not send a command for the core to refuse and the banner to report.
The range lands on the track the selected clip is on. With nothing selected it lands on the first track the material belongs on, which is the rule an import already follows, and where there is no such track one is made. The playhead moves to the end of what was placed, so a run of edits stacks up instead of laying every take over the one before it.
The source bar has no picture. Scrubbing one needs a decoder per position and a second compositor beside the one drawing the timeline, which is a monitor rather than a control; what is here is the timecode, and the poster the library shows says which medium it belongs to.
What insert and overwrite each promise
Insert opens a gap at the playhead the length of the range and moves everything from there on back by exactly that much — on every track, not only the one being edited. That is the one thing an insert must never get wrong: sound and picture are separate tracks, and a gap that opened on only one of them would put the timeline out of step from that point on for the rest of the film. A clip that reaches across the insertion point is cut in two first, and the far half reads on from where the near half stopped, so taking the material back out again leaves a cut nobody can see. Groups travel whole, across tracks included.
Overwrite places the range at the playhead and lets it replace whatever occupied that span, on the one track named. Nothing moves, so the timeline keeps the length it had unless the material reaches past the old end. A clip the span falls wholly inside is left as a head and a tail; a clip the span merely clips is cut back to the edge; a clip it covers is gone, and its transition goes with it — a dissolve belongs to the edge it was authored on, and that edge no longer exists.
Both are one command, so both are one step on the undo stack however many clips moved. An insert across three tracks and a dozen clips is a single Ctrl+Z.
One thing they do not do: markers do not ripple. They keep their absolute positions.
A locked track refuses both of them outright, and it does not matter which track was named. An insert opens the gap on every track, so skipping the locked one would move the picture out from under its own sound — the one thing the operation exists to prevent. Refusing is the honest answer; unlock the track and edit, or leave it alone.
A transition on every cut
A slideshow is fifty pictures and forty-nine dissolves, and setting them one at a time is the same click forty-nine times. The select on the timeline's toolbar names the transition and the walk finds the cuts; its first entry takes them all away again.
Only where two clips actually meet. clip.setTransition writes a clip's incoming transition, so each clip is asked one question: does something end exactly where I begin? A transition over a gap would be a dissolve out of the background, and one on the first clip of a track is a mix with nothing.
A cut whose shorter neighbour cannot give the transition its length is skipped too — half a dissolve reaching past the start of the clip before it is a mix with something that is not there yet. Locked tracks are passed over, and the whole sweep is one step in the history.
Holding one frame
Freeze the frame here on a clip's own menu holds the frame under the playhead for two seconds and lets the clip go on afterwards where it left off.
It is not a new command and not a new kind of clip: a freeze is two cuts and a rate of zero. The middle piece gets a speed track reading zero for its whole length, and a rate of zero consumes no source — so the piece shows the one frame it starts on for as long as it lasts. That is already what the core means by a frame hold, and the reason zero is legal on the track and not on Speed::rate, where it would be a clip that consumes nothing at all.
The piece after it is slipped back by the held duration. Splitting sets each half's in point from where the cut fell, which is right for a cut and wrong here: the held piece consumed nothing, so the tail has to carry on from the frame the freeze started on. Without that slip a freeze puts a jump at the end of itself — measured, along with the timeline staying exactly as long as it was.
The entry is greyed out where the clip has no room: a hold needs material on both sides of it, and a freeze at an edge is a cut with nothing between its two halves.
The same edit in another shape
Project ▸ Change shape turns a widescreen cut into a portrait, square or 4:5 one. The frame takes its new size and every clip is scaled to cover it in the same step, because a reframe that left black bars down both sides is not what anybody meant by one.
The factor is applied to what the author already chose rather than replacing it, so a clip blown up to 1.5 keeps that relationship to the others. Placement scales with the frame it is measured in — each axis by its own ratio — so a lower third stays a lower third instead of ending up 1080 pixels from the middle of a taller frame.
A locked track is passed over, the same rule cutting at the markers follows. Frame and clips move in one step, so one undo puts the whole thing back.
Pasting attributes
Copy a clip, select others, and Paste attributes puts the first one's look on all of them: geometry (position, scale, rotation, anchor, opacity and crop, with the keys that animate any of them), the effect chain with its parameters and keys, and the gain and speed ramp.
The model is the clip on the clipboard, which is what the copy already put there. A second store for "the clip whose look I want" would be a second thing to keep in step with the first, and the question "which clip is the model" has one honest answer: the one you copied.
Effects are added by type and then set parameter by parameter, because that is the whole of what the command bus offers — there is no "replace this chain" command, and inventing one would put a second authority on what a chain may contain next to effect.add. A type the target already carries is left where it is and its parameters are written again on top: effect.add treats a repeated type as a no-op, so pasting twice cannot grow a second brightness.
Keys travel with whatever they animate, and with their interpolation and handles — a paste that dropped the easing would hand back a move that lands in the right place and gets there wrongly. The whole press is one step in the history, however many clips it touched.
Finding the cuts in a recording
Built. A card off a camera is one long file with a dozen takes in it, and the first thing anybody does with it is find the joins by hand. Find the cuts in this clip, in the clip's context menu beside the split, does it by looking.
Every frame of the clip is reduced to a grid of 32 by 18 brightnesses — Rec. 709 luma, so a cut between two frames of the same brightness and different hue is still a cut — and consecutive grids are compared as a mean absolute difference. A moment where that difference is both large in absolute terms and much larger than the moments around it is a cut, and the clip is split there.
| Rule | Why it is there |
|---|---|
| A threshold of 0.12 | a tenth of the whole brightness range, averaged over every cell: a cut between two shots clears it, a flash or a hand across the lens does not |
| Three times the neighbourhood | what tells a cut from a dissolve. A dissolve changes the picture as much as a cut does, spread over a second — so it clears any threshold a cut clears, on every one of its frames. A cut is a spike, and this is the test for one |
| The neighbourhood as a median | because the window may contain another cut, and one large value drags a mean up far enough to hide the next join. Measured: two cuts eight frames apart, one loud and one modest, and a mean loses the modest one |
| Eight frames between cuts | nothing cuts twice inside a few frames; a flash frame otherwise reports two, and the louder of the pair is the real join |
Frame by frame, off the proxy. Sampling every second frame would halve the work and report a cut up to two frames late — and two frames of the previous take at the head of a clip is exactly what somebody would then fix by hand, which is the work this was meant to save. The proxy rather than the original, because a cut is a change in the whole picture and the smallest copy shows it just as clearly.
A cut is reported as the first frame of the new shot, which is the frame a split has to land on. Splitting at the last frame of the old shot would leave one frame of the old take at the head of the new clip.
Source times, turned back into instants by the core. The scan reads the file and knows nothing about where the clip sits or how fast it runs, so what it returns are moments of the source. timelineTimeAt inverts the map the renderer uses in the other direction — by bisection, because that map is the integral of a rate track and a ramp leaves it no closed-form inverse. It is monotone, rising at a forward rate and falling at a reversed one, which is exactly what bisection answers; forty steps put it inside one flick. A cut in material the clip trims away has no instant and is dropped.
Every split goes out under one coalesce key, so a card that turns out to have forty takes in it is one press of undo and not forty.
Cutting at the markers
The marker list carries one action of its own: cut every clip the markers pass through. With beats marked on a music track that is "cut on the beat" in one press — and one step in the history, however many cuts it made.
It is applied one cut at a time against the live document, because a list of commands built up front cannot be right: a split mints two clips out of one, so the second cut through the same clip would name an id the first has already retired. Each clip is found again by where it sits, immediately before it is cut.
A marker sitting exactly on an existing cut has nothing to do and is passed over rather than asked about, and so is a locked track — the core would refuse it either way, and one locked track must not take the other five with it.
The picture is a control
Select a clip and a box appears on the frame with a handle on every corner and one to turn by. Dragging inside it moves the shot, a corner scales it and the handle above the top edge rotates it — on the picture, because that is where the answer is: a number in a panel says 1.4, and only the picture says whether the face is still in shot.
The corners are not an approximation of where the clip lands. clipQuad in the engine and quadMatrix — the matrix the compositor hands the GPU — are checked against each other over translation, uneven scale, rotation, an off-centre anchor and every combination with a crop, so the handles sit on the picture rather than near it.
| Gesture | Result |
|---|---|
| Drag inside the box | moves the clip, in project pixels whatever the pane is scaled to |
| Drag a corner | scales it, with the opposite corner staying exactly where it is |
| Drag a corner with Shift | scales each axis on its own instead of keeping the aspect |
| Drag the handle above the top edge | turns it about the middle of the picture |
| Turn with Shift | snaps to whole 15° steps |
A corner of a turned clip grows along the edge it is on rather than along the screen, and a rotation is the angle between where the handle was grabbed and where the pointer is now — not a delta anyone accumulates, so a pointer that leaves the window and comes back lands where it is.
The box ends where the picture's pane ends. A clip scaled far past the frame draws a box larger than the pane it lives in, and unclipped that box lay over the inspector and swallowed every press meant for the sliders underneath. A handle that falls outside is reached through the row's own number field instead.
The whole drag is one step in the history, the same bargain the timeline's own drags make: the coalescing key is minted on the way down and dropped on the way up, so a hundred pointer moves are one Ctrl+Z. Every one of them goes through clip.setTransform, so the fields in the properties panel move with the box and a keyframe set from either side means the same thing.
The line it travels
Put Position X or Position Y on the clock at two instants and the trajectory appears on the frame as a dashed line, with a handle on every key. Drag a handle and the clip stands somewhere else at that instant and nowhere else — which is what makes it a path rather than a second way of setting the transform.
The line is sampled, not drawn from the keys: forty-eight instants across the clip, each asked of the core. What a segment does between two keys is the core's answer — an ease, a bezier's handles, a hold — and a line drawn corner to corner would be a second, prettier claim about where the clip goes. The handles sit on the line for the same reason: a key's place is where the clip stands at its instant, which is the same question the line is sampled from.
Three tracks can move a clip and any of them draws a path: the position track, which a template authors as one shape, and the x and y tracks the properties panel writes. A key is written back into the track it came from — one vec2 for the first, an x and a y for the others, because moving only one of a pair would drag the clip sideways when the pointer went diagonally.
keyframe.add at an instant a key already sits at takes its place rather than adding a second one there, so a drag across the picture is one key changing value however far it travels — checked in a real browser, on a real drag, against the number the properties panel reads afterwards.
Locked tracks
The padlock beside a track's name is a promise: nothing on that track moves until it is unlocked again. It is enforced in the core, in one gate in front of the whole command dispatch rather than in each of the twenty handlers that could edit a clip — a lock half the commands honoured would be worse than no lock at all, and the next command anyone adds would be a hole nobody notices.
What it covers is the timeline: the clips on the track, their trims, their speed, their transforms, their effects and keyframes, the track's own effect chain, and the track itself. What it leaves alone is the mixer and the name — a locked track is still faded, panned, muted and soloed — and the flags themselves, which is how a track is unlocked again.
The timeline does not wait for that refusal to arrive. A clip on a locked row is not a drag target at all, so it never comes away from under the pointer and springs back; the row is hatched, and the padlock beside its name says why.
Tracks
The two buttons on the left of the timeline toolbar make an empty track — one video, one audio — and the new one is active at once. Active means it carries a light border, and everything that has to put a clip down without having been told where asks it first. A track is activated by clicking its header.
A right click on free space on a track opens that track's menu, for the spot that was clicked:
| Entry | Result |
|---|---|
| Place medium here … | opens the list of imported media and puts the chosen one at that spot |
| Paste here | puts the clipboard at that spot rather than at the playhead |
| Rename track | asks for a name |
| Delete V1 | takes the track and everything on it; one undo brings both back |
The dialogue behind Place medium here … shows only what the project already holds: thumbnail, name and length, and a double click places. It imports nothing — that is what the import dialogue is for — and it is the answer to a menu with eleven media in it that nobody reads.
New tracks are counted by their kind: the third video track is V3, even where the project already holds four audio tracks.
A track's name, and taking a track out of the picture
The name in the header is the field: click it and type. V3 says nothing about which of three takes is on it, and a rename that lives only in a context menu is a rename nobody finds. A typed name is one undo step, not one per letter.
The name has the header row to itself, and the buttons have the row under it: out of the picture, locked, taller, shorter, gone. They are quiet until the pointer is on the header and lit while it is — but they are always there to be pressed. Revealing them on hover and taking them out of the hit test in between meant the first press after arriving landed on the header instead, which is a control that has to be aimed at twice.
The eye beside the padlock takes the row out of the picture. The clips stay where they are, the preview and the export leave them out, and the row goes quiet so the reason is on screen rather than in a menu. It is how a stack of four graded layers is taken apart to see what each one does — and unlike deleting the row to look, it is one click back.
On a sound track the same button is a loudspeaker and mutes the row, which is the same flag the mixer's M sets. A sound track paints nothing, and an eye on it would promise something it cannot do.
Names for what Videola makes itself
A row somebody asks for is V1, A2, T3 — theirs to name. A row that arrives with something already on it says what that is: a lyric video lays down Songtext and Lyric-Video, and a visualiser with it Visualizer; imported subtitles land on Untertitel; an insert names its row after what was inserted. A template's rows carry the template's own names — background, title, kicker — and a name the project already uses is numbered rather than repeated.
The same goes for what stands on them. A clip nobody has named says what it is rather than "unnamed": a title says its own first line, a colour field says it is one, a visualiser says so. Sixty clips reading "unnamed" is a timeline that has to be clicked through to be read at all, which is what a lyric video looked like. A name somebody types beats all of it.
Carrying a medium over
A library entry is carried onto the timeline with the button held down. On the way its name hangs off the pointer, so that there is something to see at all; the row under the pointer is highlighted, and a vertical line shows the instant the clip would start at.
Under the last row, for as long as something is being carried, there is a dashed row: New track. Releasing there makes a track and puts the clip on it, and the two together are one step back. A project with no tracks at all has nothing else — before, there was nothing there to aim at, and the first drag onto an empty timeline quietly did nothing.
The timeline
| Gesture | Result |
|---|---|
| Click a clip | selects it, and the whole group if it is in one |
| Ctrl/Cmd or Shift click | adds a clip to the selection, or takes it out again |
| Drag the middle of a clip | moves the whole selection, across tracks when one clip is dragged |
| Drag a clip edge | trims that edge |
| Drag in the ruler | scrubs |
| Drag over empty timeline | a rubber band: every clip it touches is selected |
| Two pointers | zooms by the change in distance |
| Long press, right click | opens the context menu of the clip or the marker under the pointer |
A press inside a selection of several clips keeps it — otherwise the press that starts a drag would have thrown away what it is about to move. Releasing without dragging narrows it to the one clip.
The rubber band selects what it touches, not what it swallows whole: at a working zoom most clips are wider than the window, and a band that only took the ones it contained would be useless. It resolves on every pointer move rather than on release, so dragging back over a clip takes it out again — and a band dragged shut selects nothing, which is how a band is undone without letting go. Under four pixels there is no band at all: a press that trembled is a click, and a click on empty timeline clears the selection.
Rows are drawn top first while tracks[0] is the bottom one, so the row range a band covers is sorted rather than taken from the press — a band dragged upwards would otherwise come out empty.
Everything runs through Pointer Events, so mouse, pen and finger take the same path. When the pointer is not a mouse the trim zones grow to 44 px, because a 4 px target at the end of a clip is not reachable with a finger.
A whole drag — two hundred pointer moves — is one undo step. The commands carry a coalesce key that pointerdown mints; the next pointerdown mints another one. The inspector's sliders work the same way, and it is the same rule that makes a slider drag over a keyframed parameter one entry on the undo stack instead of two hundred keyframes on the same spot.
A clip's own name, and how tall a row is
Two fields the model has carried since the first schema with nothing able to set them, which is the same gap Effect.enabled had: the strip already showed a clip's own name over its file name, and the layout already laid a row out at its height.
The name is a field in the properties panel, first in the list — after cutting a card into forty takes, forty clips called card_0031.mp4 is a timeline nobody can read. Emptying it puts the file name back, and an empty name is stored as absent rather than as an empty string: the two look identical on the strip and different in the file, and a project full of empty strings claims every clip was named. Typing goes out under one coalesce key, so a name is one press of undo rather than one per letter.
The height is two buttons on the track head, stepping by 24 px — a third of the resting row, so three presses double a track and three halve it. Buttons rather than a drag on the header: a drag there would have to be told apart from the timeline's own gestures, and a step is what somebody wants anyway. The core clamps the floor to the 44 px the layout treats as a minimum, because a height the model accepted and the layout ignored would be a number that lies, and the ceiling to a screen's worth. On a coarse pointer the buttons are not drawn — a row's height is not what a finger came for, and pinch already zooms.
Snapping
Snap in the toolbar toggles it. Candidates are the playhead, every clip edge on every track, markers and a grid. The catch radius is computed in pixels and converted to flicks, never the other way round, so it stays the same size on screen at every zoom level. Holding a modifier during a drag suspends it.
Edge and clip modes
Two lists in the toolbar decide which command a drag sends. They are lists rather than modifier keys because a finger has no modifiers, and because the mode has to be readable before the drag rather than guessed from what it just did.
| Edge drag | What moves |
|---|---|
| Trim | that edge, and nothing else |
| Ripple | that edge, and every clip after it on the same track by the same step |
| Roll | the cut this edge shares with its neighbour: the pair keeps its total length |
| Clip drag | What moves |
|---|---|
| Move | the clip, along the track and across tracks |
| Slip | the material behind the clip, which stays where it is and keeps its length |
| Slide | the clip along the track, with the clips that meet it absorbing the step |
Roll refuses where no clip meets that edge, and every one of them refuses a step that would empty a clip or read from before the start of the material. A refusal during a drag is ordinary: the edit simply does not happen, and no error is reported for it.
A ripple of the head is the one that looks odd until you try it: the clip stays where it is and its material moves, because leaving the clip glued to what is in front of it is the whole point of a ripple. What the pointer changes there is the length, not the position.
The keys that belong to the project
| Key | Result |
|---|---|
| Ctrl+Z / Ctrl+Shift+Z | undo, redo (Ctrl+Y redoes as well) |
| Ctrl+S | writes the project |
| Ctrl+O | opens one |
| Ctrl+E | opens the export |
These five listen on the window, so they answer wherever the focus is — a field with the focus keeps them, because Ctrl+Z in a text field is that field's own undo and taking it away to undo an edit two panels over is how work gets lost.
Ctrl+S is taken whether or not this project has anything to write. The browser's own save dialogue over an editor is the one thing it must never produce.
Deleting, cutting and pasting
| Key | Result |
|---|---|
| Delete | removes the selection and leaves the gap |
| Shift+Delete | removes it and closes the gap: every later clip on the track moves up |
| Ctrl+C / X / V | copy, cut, paste at the playhead |
| Ctrl+G / Ctrl+Shift+G | group, ungroup |
| N | folds the selection into one compound clip |
| M | sets a marker at the playhead |
| S | cuts at the playhead |
| Ctrl+A | selects every clip |
| Ctrl+D | duplicates the selection, each copy directly behind its original |
Switch this clip off sits in the context menu beside the two deletes, and it is what somebody reaches for instead of one: a clip switched off keeps its place, its length and everything else about it, and one press puts it back. Nothing draws it — no decode, no effect pass, no upload — and nothing plays it, because the renderer and the audio graph read the same flag. It is drawn dimmed and hatched on the timeline, because opacity alone reads as "not selected" on a small strip. That is the way to compare two takes; deleting one and pasting it back is a different operation, and it loses where the clip was.
S cuts every selected clip the playhead stands inside, or — with nothing selected — every clip it stands inside at all. Not at an edge: a cut there is a clip of no length on one side, which the core refuses, and a refusal out of one keystroke is an error message for something that meant nothing. A locked track is left alone.
A selection is a set of ids, and an undo can take the clip an id names away. The timeline forgets such an id as soon as the project changes, because every action that reads "is there a selection" would otherwise say yes and then find nothing to do — which is how a key that works comes to look broken.
Every unmodified key belongs to the timeline and needs its focus; a field inside it keeps its own keys, so typing an m into a marker's name does not drop a marker per letter.
All of them sit in the clip's context menu as well, and an entry that cannot do anything — paste with an empty clipboard, group with one clip selected — is disabled rather than sending a command the core would refuse.
Ripple delete only moves what begins at or after the end of the deleted clip. A clip that reaches across that end stays where it is: closing a gap must not create an overlap nobody authored.
The clipboard holds whole clips, not references — speed, transform, effects, keyframes and the material offset travel with them. A paste puts the earliest one on the playhead and keeps the spacing of the rest, on the track each came from where that track still exists. Ids are minted by the core, so a clip pasted twice is two clips and not one clip mentioned twice.
Grouped clips are selected together and dragged together, and a group survives everything except Ungroup. A pasted copy joins no group: it carries the original's material and look, not its membership.
Nesting
Nest, or N, folds the selected clips into a single compound clip. The compound covers the span they occupied and lands on the lowest track any of them was on; inside it, the clips keep their positions relative to each other and one nested track per track they came from — track one is the bottom of the stack in there as much as out here.
Folding changes nothing about the picture or the sound. Nesting two clips and playing the result gives back exactly the frames and the samples the two gave before, which is what the pixel and audio checks assert against the render taken before the fold.
From there the compound is an ordinary clip: move it, trim it, give it a speed, put an effect on it. Trimming it cuts what is inside — its in point and duration decide how much of the nested timeline it consumes — and a speed on it retimes everything in it, backwards included. Nesting may go eight levels deep; a ninth is refused rather than stored and then quietly not drawn.
A compound is isolated: its clips are composited onto a surface of their own, and its opacity, blend mode, effect chain, crop and transition then meet that one finished picture. Fade a compound holding two overlapping clips to half and the overlap reads exactly what the rest of it reads — 128 over black, where fading each clip separately made the shared strip 191 and drew a seam between them. Blend it and the blend runs once rather than once per clip; crop it and the crop is a cut through the group rather than something with no meaning in any one clip's own frame; put a dissolve on it and the picture underneath is mixed in once, which is why a transition on a compound is authorable at all.
The surface costs a full frame of memory per level of isolation — 8.3 MB at 1080p, so 66 MB for a project nested as deep as one may be, and twice that if every level also carries an effect chain or a dissolve — and it is held until the preview is torn down. A compound that fades nothing, blends nothing, grades nothing, crops nothing and dissolves nothing is therefore drawn flat instead: the surface would hand back exactly what went onto it, and drawing flat is what keeps folding changes no pixel true byte for byte rather than nearly.
There is no un-nest: Ctrl+Z takes a fold back, and a compound reopened from a saved file stays one.
Markers
Set marker in the toolbar, or M, puts one at the playhead. Clicking a marker on the ruler moves the playhead there; its own context menu deletes it. Markers are snap candidates, which is half of what they are for.
Markers (n) beside the button opens the list, over the tracks rather than above them — the picture is the largest zone on this screen and a list nobody has opened must not take a row of it. Every marker is a row: a colour, the timecode as a button that jumps there, a name and a note.
The colour is the operating system's own picker and comes back as the #rrggbb the core already accepts. The name is what the ruler could show; the note is the longer text, and it is what a list of thirty markers is read by. Typing in either is one undo step per field and per marker rather than one per letter.
Shift+→ and Shift+← jump to the next marker in that direction. Standing exactly on one does not count as being ahead of it, so the key moves on rather than landing on the same marker again.
On magnetic timelines
Videola has no magnetic mode, and this is a decision rather than a gap. The useful half of one — closing the gap an edit leaves — is already here as ripple delete and ripple trim, per edit and per track, where you can see what moved. The other half is a different overlap rule for the whole model: in a magnetic timeline clips cannot overlap, so every move pushes its neighbours and a transition needs a slot the model reserves rather than an overlap the author builds. Videola's model allows overlap on purpose — that is what a transition, a picture-in-picture and a crossfade are made of — and changing that would change what every existing project means. If it ever arrives it will be a mode you turn on, not a rule that appeared underneath you.
Zoom, and the keys that move the view
+ and - zoom, and 0 puts the whole edit in the window. The zoom is anchored on the playhead where the playhead is on screen and on the middle of the view otherwise — a fixed centre zooms away from whatever somebody scrolled to. Home and End take the playhead to either end of the edit.
0 sets a zoom rather than stepping towards one. A factor applied in a loop would stop on the clamp at a zoom that is nearly right instead of the one that fits.
The view follows a running transport
While the transport runs, the timeline pages ahead to keep the playhead on screen: it jumps when the playhead reaches within a tenth of the width of the right edge, and lands with that tenth as lead-in so the next few seconds are already visible. A view that scrolled a pixel per frame would be unreadable, and one that crept a pixel at a time under a hand would fight it.
While something is being dragged, a hand held near the left or right edge of the timeline takes the view with it, faster the nearer the edge. The clip keeps following the hand, because what it follows is the instant under the pointer and not the pixel: the view moves underneath. Without it, a clip could only ever travel as far as the window is wide, and moving something a minute later meant letting go, scrolling, and picking it up again.
Standing still and with nothing in hand, the timeline never scrolls itself. Somebody who scrolled away to look at something else did that on purpose.
What a zoom step is
Zoom is flicks per pixel. The lower bound rises with project length: the content element is as wide as the whole project, and browsers stop honouring element widths above roughly 33 million pixels — past that the timeline would silently truncate instead of scrolling. Zooming out far enough merges runs of clips too thin to tell apart into a single box, which is what keeps the node count tied to the viewport instead of the material.
The inspector
Selecting a clip opens its properties beside the picture. Every control sends a command; the inspector holds no state of its own.
| Group | What it does |
|---|---|
| Transform | position, scale, rotation, opacity, and Fit to frame |
| Sound and speed | clip volume, playback rate, and a reverse switch |
| Transition | a cross dissolve on the clip's incoming edge, and its length |
| Effects | add an effect, then one row per parameter |
clip.setTransform carries the whole structure, so a row reads the clip's current transform, replaces its own field and sends it back. Anchor and crop have no row: both are fractions of the source with nothing on screen to grab, and they wait for an on-canvas handle rather than getting a slider that nobody can aim.
There is no row for the audio fades. The model carries them and the audio graph plays them, but no command sets them — a slider there would write nothing.
Typing a number, and taking it back
Every row carries a field beside its slider that the value can be typed into. A slider two hundred pixels wide cannot be asked for −0.4; the field can, and it takes the decimal comma it also displays the value with. Anything past the row's limits is pulled onto the nearest one, and anything that is not a number at all changes nothing.
Beside it each row carries a reset that puts the value back to what an untouched clip rests at, greyed out while the row is already there. Reset everything under the group does it for the whole placement at once. That is what makes playing with keyframes bearable: the way back is one press rather than a memory of what the number used to be. Anchor and crop stay where they are — neither has a row here, and putting back what was never shown is a change nobody can see coming.
Keyframes
Every parameter row — an effect parameter and every transform field alike — carries a keyframe switch, arrows to the previous and next keyframe, and, where one sits under the playhead, a picker for what happens after it: linear, hold or ease. The switch sets a keyframe at the playhead or removes the one already there. A row whose parameter has keyframes anywhere on the timeline is marked with a diamond beside its label: the three switches only ever report the playhead, so a row animated somewhere else looked exactly like a row animated nowhere.
The value on the row is the one the core gives for that moment — Effect::param_at through doc.effectParamsAt, Clip::transform_at through doc.transformsAt — never a calculation of its own. Interpolating in TypeScript would give the preview and the export two different answers for the same frame. See Keyframing a transform for the command a transform row sends.
Once a parameter is keyframed the slider writes keyframes rather than the static value, and it writes them at the playhead. keyframe.add is an upsert, which is what makes a drag one undo step; it replaces the value and the interpolation of the key already there and leaves its bezier handles alone, because no command carries a handle pair and destroying one would be the only other thing an upsert could do with it. While the playhead stands outside the clip the keyframe controls are locked: a keyframe written there is never evaluated for this clip, so the switch would report a state no picture ever shows.
Two rows carry no switch at all. Where a clip has a motion path the core resolves x and y from it and ignores whatever the two fields hold, so a keyframe written on either would be stored, saved and reloaded without ever reaching a pixel. For the same reason Fit to frame goes dead while the placement it would write — x, y, either scale, or the path — is on the clock.
Volume and speed carry their keyframes the same way. Volume got a track of its own for it — volume, the second after speed that names no transform field — and the audio graph is what reads it: a clip's envelope is its keyframed level multiplied by its fades, because a fade is the shape of the edit and the level is the height of the material. The rate row writes to the same speed track the speed ramps live on; both ways mean the same curve.
Recording keyframes
The round button in the transport is record mode: while it is pressed every setting belongs to the playhead rather than to the clip. A slider on a field nobody has animated writes a key where the playhead stands, and so does a drag on the picture itself, which otherwise changes the placement of the whole clip. That is how a move is made: put the playhead somewhere, change what you want changed, move the playhead on.
The window carries a thick purple border while it is on. A mode that reverses the meaning of every change is worthless if you cannot see that it is on.
Two things stay as they are in record mode. With the playhead outside the clip there is no instant to write to, so the value at rest applies again. And a drag on the picture writes only the fields it actually changed; a move that also wrote a scale key would pin down a size nobody asked to animate.
The first key on a field brings the clip's start with it. A single key holds its value over the whole clip — before it as well as after — so an opacity recorded two seconds in used to change the first two seconds too. So the first key on a field is written together with one at the clip's start carrying what was there before: everything up to it stays as it was, and the ramp starts there. The two go out under one key, so they are one step back.
Only the first: a track that already carries keys has a shape somebody made and gets no anchor added to it. And only where the playhead stands past the clip's start — standing exactly on it, the key being written is the anchor.
The keyframe lane
Under the tracks, inside the timeline's own scrolling area, is a lane showing the keyframes of the selected clip: one row per keyframe track, named the way the properties panel names it, with a point per keyframe and the gap between two points drawn in the shape of the interpolation that times it — solid for linear, broken for hold, faint at both ends for ease.
It sits in the timeline rather than in the properties panel so that there is one conversion between pixels and time in the whole application and not two. The lane, the ruler, the clips and the playhead are all positioned by timeToX out of the same flicksPerPixel and the same scroll offset, so a keyframe stands on the ruler tick of its own time by construction rather than by agreement. A lane in the properties panel would need a second axis over the panel's width, its own scroll and its own playhead — two answers to "where is now", which is the one thing a keyframe editor cannot afford. Keyframe times are absolute timeline time in the model, the same instants the playhead reports, so nothing is converted between the two ends.
Press a point to pick it; drag it to move it. It is the same pointer path clips use, so it works with a mouse and with a finger without a second code path, snapping applies (hold Alt to suspend it), and one drag is one entry on the undo stack. A drag stops at the clip's edges, because a keyframe outside the clip is never evaluated for it — and because a clamp is what keeps the core from refusing once per pointer move, which is how a trim held against its limit once produced nine error banners in a single drag.
Above the lane, while a keyframe is picked, is a bar carrying what that keyframe is set to: its parameter's name, the interpolation of the segment that starts at it, and a delete button. The bar sits outside the scrolling area so that it stays reachable on a long project, and the button is there because a finger has no Delete key. With a keyframe picked, Delete removes that keyframe rather than the clip under it.
Rows a motion path has taken over are struck through and marked overridden by the path. They are not hidden: the keyframes are still in the file, and the lane exists to show what is stored.
The curve field
Beside the interpolation, the bar carries a Curve disclosure. It opens over the tracks the way the marker list does, and it shows the one segment that starts at the picked keyframe: a square field with the travel plotted from 0 at the left key to 1 at the right one, the even-paced diagonal dashed behind it so the shape reads as a departure from it, and — once the key is set to bezier — the two handles that shape it, each tethered to the end of the segment it governs.
Why it is not in the lane. The lane rides the timeline's own time axis, which is what makes a keyframe line up with the ruler and the playhead without anything having to agree on where now is. A curve needs a value axis the lane has not got, and a 26 px row (44 px under a finger) has nowhere to put one. It also needs room across: a segment is usually a fraction of a second, which at the default zoom is about fifty pixels — less than one touch target, so a handle on the timeline's axis could not be dragged without zooming the whole timeline to it. The field's x is not a second time axis at all: it is the segment's own 0..1, the unit square a handle pair is already stored in, exactly as CSS cubic-bezier spells it.
The line comes out of the core. The field asks keyframe::segment_shape for its samples — the same function interpolate applies to move the picture. Easing written again in TypeScript would pass every end-point check ever written and be wrong in the middle, and a curve that looks like one thing while animating like another is the one fault a curve editor must not have.
Dragging a handle sends keyframe.setHandles, one dispatch per pointer move under one coalesce key, so one drag is one undo step. Each write carries the whole pair the keyframe holds: sending only the one under the hand would clear the other back to the default. handle_out belongs to the picked key and handle_in to the key after it, so the last keyframe of a track has no field of its own — its arriving handle is reached from the field of the key before it. The three presets stay a single click; the curve is the fourth entry beside them, not a mode that replaces them.
Two rules the field shows rather than merely obeys. A row a motion path has taken over says so inside the field as well as in the lane header — the curve is real, and it changes no picture. And a rate track is never offered bezier at all: keyframe::integrate has no exact area under a bezier, the additivity consumed_source rests on would go with it, and the core refuses the change. An entry that could only ever produce a refusal is worse than an entry that is not there.
The field reaches past the unit square, by a third at each end, and that is what makes a bounce authorable: a handle whose y is above where the travel arrives sends the value past its destination and brings it back. Two firmer lines mark where the travel sets off and arrives, so an overshoot has something to be an overshoot of, and the unit square itself is kept square — the field is taller than it is wide by exactly that third at each end — so the dashed diagonal is a diagonal and the evenly paced travel it stands for reads as one.
One shape for the whole move. Under the field, on a track of more than two keys, is the answer to "copy this curve": the picked segment's easing on every other key of the same track. A shape somebody spent a minute on is a shape they want for the move, not for one segment of it, and setting it again key by key is that minute over and over. The interpolation travels with the pair, because handles on a key set to linear are stored and ignored — a copy of the pair alone would be a press that changes nothing. One press is one step in the history.
Beside it, where the clip animates more than one parameter, is the same shape on every parameter of the clip. That was written off once as needing the two tracks' keys to line up, and it does not: an easing belongs to a key, not to a moment, so each key runs the shape over its own segment however long that segment is. What matching times would buy is an identical curve over time, which is a different thing from a move that eases the same way — and the second one is what somebody means by "make the rest match". One press, one step in the history, whatever it touched.
The key it was picked from is written too, with what it already carries. Leaving it out would be a filter for nothing: json_patch::diff produces no patch for a field that did not change.
A drag is held at what the field shows rather than at the unit square, and past that it stops: a handle dragged clean off the top would be a shape no drag could bring back. x is still clamped to 0..1, and that clamp is the core's — cubic_bezier_y_at bisects on x and needs it to rise across the span, so the same clamp answers for a project written by hand and for a handle dragged here.
Speed ramps
A clip's rate is not one number any more. Speed { rate, reverse } is still what a clip runs at when nothing is animated, but a clip can carry a rate track — keyframes under the key speed, in the same factor rate uses — and then the speed is a curve over time.
That changes the arithmetic underneath rather than adding a feature beside it. Where the mapping from project time to source time used to be
source = in_point + (t - start) * rateit is now the area under the rate curve:
source = in_point + ∫ from start to t of rate(u) duA clip running from half speed to double over two seconds has spent 0.875 s of its material after one second, not 1.25 s. Every proportional reading of that moment — the rate at the instant, the average rate, the static rate — gives a different answer, and all of them are wrong.
Clip::consumed_source() is the same integral asked for the whole clip, deliberately: the total and every prefix of it come out of one function, so they cannot drift apart. A reversed clip reads in_point + consumed − area, and the moment those two were computed separately its first frame would fall outside the range a decoder may read.
The sound follows the same curve, not a copy of it. An AudioBufferSourceNode reads its buffer at the running integral of playbackRate, which is that same integral. The audio graph hands the platform the rate curve as automation, so the picture and the sound are not two implementations that have to agree — they are one mapping, computed twice by two engines that both do calculus.
What a rate keyframe may be
| Value | a number from 0 to 100 |
| Interpolation | linear, hold or ease |
| Zero | allowed, and it means a frame hold |
bezier | refused |
| On a compound clip | refused |
| On a clip you then nest | refused |
bezier is refused because its easing has no elementary antiderivative in the track's own time, and an inexact area would break the one property everything rests on: that the area over a span is the sum of the areas over its parts. Compound clips are refused in both directions because folding a nested timeline in or out inverts the outer rate by dividing, which only works while that rate is one number. Flatten the ramp, or nest first and ramp afterwards.
Project::normalize() refuses all of it on load, and the keyframe.* commands refuse the same shapes through the same function — so a ramp one route accepts is never a ramp the other refuses to open.
Presets
A preset is a list of commands sent under one coalesce key. It is not a thing in the project file, and that is the point: Dispatch.coalesceKey already collapses a list into one undo step, the patch and its inverse already come from json_patch::diff, the command layer already refuses every field a preset would otherwise have had to check itself, and POST /api/projects/:id/commands already carries a list under one key. A preset in the model would need its own load boundary, its own undo and its own wire format, and would become a second authority on what a quarter-size picture in the corner means — one the commands could then disagree with.
So every preset below is reachable from an agent by sending the same commands. The builders live in packages/core/src/presets.ts.
| Preset | What it sends |
|---|---|
| Freeze from here | two keys on the rate track: the clip's own rate, held, then zero |
| Slow start / end / middle | two or three eased keys on the rate track |
| Ken Burns in / out | two keys each on scaleX and scaleY, plus a two-point motion path |
| Picture in picture | one clip.setTransform, and a clip.move where a track sits above |
| Split screen | one clip.setTransform per clip, each cropped to its own half |
Freeze from here is a rate of zero and nothing else — no still-image clip, no second kind of source, no branch anywhere downstream. The frame it stops on is the one the playhead was showing, and the sound stops with it through the same track. It is refused on a reversed clip: backwards, a clip reads in_point + consumed − area, so zeroing the rate shortens consumed and moves the frame the clip is anchored to rather than the one it stops on. The button is disabled rather than wrong.
Ken Burns starts from the scale at which the material covers the frame, so the corners never open onto the background at either end of the move.
Split screen crops each clip to the half it stands in rather than squashing it, so both keep their proportions.
Putting something down that is not a medium
Insert in the project menu lays down a title, a shape or a countdown at the playhead. Five entries, one question: a lower third, a full-frame title, a credits card, a shape, or a three-second countdown.
| Entry | What it lays down | Where it goes |
|---|---|---|
| Lower third | a text generator, styled left and low, over a box | a text track |
| Full-frame title | a text generator across the middle of the frame | a text track |
| Credits | a centred card with room for several lines | a text track |
| Shape | a white rectangle, which the transform then places | an overlay track |
| Countdown | three, two, one — one number per second, drawn by the renderer | an overlay track |
| Visualiser | a picture drawn from the sound | an overlay track |
The visualiser
Visualiser lays down a clip whose picture is drawn from the sound. The properties panel offers eight styles — bars, mirrored, wave, ring, tunnel, stage, particles, orb — plus a palette or two colours of your own, the number of bars, sensitivity, glow, how hard it reacts to beats, and a rotation for the round ones.
Reacts to decides which part of the mix it listens to: everything at once, or a single track, which is how a bass line gets bars of its own.
It is not drawn from an AnalyserNode. An analyser answers "what is coming out of the speakers right now", which depends on when the browser got round to asking: the same video would look one way in the preview and another in the file, differently on every machine and on every run. Instead the mix is rendered offline once and turned into a table — one row every 16 milliseconds, 64 logarithmically spaced bands, a level and a beat value. The preview and the export read the same table, so what is on screen is what lands in the file.
The analysis runs when a visualiser is on the timeline and something about the sound has changed: a cut, a fader, a muted track. On a song that is a second or two, and the editor says so while it happens. Moving a title sets nothing off.
Lyric videos
Insert → Lyric video … turns a song into a video with the words running on it. The dialogue looks for them where they usually already are, in this order:
In the file. MP3s carry them in an ID3 frame —
SYLTwith a timestamp per line,USLTwithout one, sometimes aTXXXsomebody invented. M4A has the©lyratom, FLAC aLYRICScomment. Videola reads all four, and an.lrcsomebody pasted into a tag is recognised for what it is.Pasted. Text, or a whole
.lrc, into the box. The reader takes[00:12.50]with hundredths or milliseconds, several timestamps for the same chorus, and the per-word timings of enhanced files.Transcribed. Only where the server behind the editor can listen, and the button says which of the two ways it would use.
VIDEOLA_WHISPERpoints at a transcriber on that machine — Whisper, through whisper.cpp or faster-whisper — and then nothing leaves it.VIDEOLA_ELEVENLABS_KEYsends the song to ElevenLabs instead, which is the one thing in this editor that leaves the machine, and the button says so before it is pressed. A server with both uses the local one.The local contract is a command line rather than a dependency: a model is gigabytes and a Python environment is somebody else's. Videola calls
sh$VIDEOLA_WHISPER --input <audio file> --output <json file> [--model $VIDEOLA_WHISPER_MODEL]and reads
{"segments":[{"start":1.2,"end":3.4,"text":"…"}]}in seconds, which is what faster-whisper hands back — so a wrapper around it is three lines. whisper.cpp's own-ojfile, in milliseconds undertranscription, is read as well.
What comes out is caption clips on a track of their own: one line, one clip. That is exactly why the lyrics live there rather than inside the generator — a line that lands a beat late is dragged on the timeline, with the same handles as everything else. Without times the lines are spread evenly over the song, and the dialogue says so rather than pretending to know better.
That row is also what draws the subtitle at the foot of the frame, and Burn subtitles in at the foot in the dialogue decides whether it does. Off, the row is made all the same and taken out of the picture: the lyric video reads those clips to know which line is being sung, so it cannot be deleted — but a row out of the picture draws nothing. The eye on the row turns it back on at any time, which is the same switch under another name.
Over them sits a lyrics clip that draws whatever is being sung, in twelve styles:
| Style | What it does |
|---|---|
| Kinetic | word by word, each arriving too big and settling; ink and ground trade places on every line |
| Karaoke | the whole line, filled left to right, the next one small underneath |
| Typewriter | character by character, with a caret |
| Pop | each word lands on its own beat |
| Neon | glowing letters over whatever is behind them |
| Flip (3D) | the words turn in out of the depth |
| Caption bar | a plate with the line on it, at the top, the middle or the bottom |
| Depth (3D) | the line comes at the camera from far away while the one before it flies past and is seen from behind |
| Letters travel | every letter looks for itself in the line before and moves from there to where it belongs |
| Wave | the line rides a wave, each letter a little further along it |
| Glitch | the line tears into red and blue and puts itself back together |
| Growing (3D) | every word grows out of a letter of a word already standing, the whole line in perspective |
Under the tiles are the settings the chosen style answers to, and only those: type size always, movement for how hard it travels, glow where a style has a halo, and perspective for the two drawn in depth. A slider for a setting a style ignores would teach somebody that the settings do nothing, so each style is asked which of the four it uses.
The same press can put a visualiser behind it, which makes it a finished lyric video in one go. And it is one go: a hundred lines, three tracks, one undo.
Every tile in the dialogue draws its own style in the colours that are set, and runs it while the pointer is on it. The painter is the one that draws the real thing, so a preview cannot promise a look the video will not have.
The length comes from the clip on the timeline, or from the length read out of the file at import, or from the end of the last line -- so a lyric video can be made before the song is on a track at all.
The track is chosen and not asked for: the topmost unlocked track of the right kind with nothing standing in the window the clip would occupy, or a new one. clip.add overwrites what it covers, so a second title dropped at the playhead of the track the first one is on would delete the first. Where a track has to be made, both commands go under one coalesce key — one press of undo takes the whole insert back, and a project with an empty track nobody asked for is never a state to land on.
A title starts with placeholder words, and the inspector's Text panel changes everything about it: the words, the colour, the weight, the alignment, the type size, the text width and where it sits in the frame.
Ready-made titles
Twelve of them in the Text panel — plain, lower third, headline, breaking news, neon, quotation, caption, outlined, credit line, sticker, upright hook, note. One press replaces the whole style.
Replaced rather than merged, deliberately: a preset that set only the colour would leave the previous one's tracking, box and shadow behind, and the second thing anybody tried would look like neither of the two they picked.
They are data, not code — a table of styles the renderer already reads — which is why there can be a hundred. Nothing is downloaded and nothing is licensed from anybody: the look is arithmetic over a font the system already has. A test walks the table and refuses a move the renderer does not draw or a colour that is not a colour, because both would fall back silently and look like a preset that does nothing.
How a title arrives and leaves
Under the same panel, Movement: an arrival, a departure and a continuous beat.
| Move | What it does |
|---|---|
| Fade | in or out of nothing |
| From below | rises the last few percent of the frame's height while fading in |
| From above | the same, downwards |
| Grow | opens from 85 % to full size |
| Pulse | a continuous ±4 % breath, at a beat you set |
The arrival runs at the head of the clip and the departure at its tail, so the length of the move is a number and the placement is the clip: drag the clip longer and the middle gets longer, not the movement. The seconds field appears only once a move is chosen, because a duration for an animation that does not happen is a question about nothing.
These are presets, not keyframes, and deliberately so. A keyframe is resolved in the Rust core, and a second interpolation living next to it in the renderer would be exactly the divergence the core exists to prevent — so what moves here is the quad the glyphs are rasterised onto, evaluated in the one place the preview and the export both go through. A title that is also keyframed animates and follows its preset: the preset is applied on top of whatever the core resolved.
The renderer draws five moves and one loop, and nothing else. A style naming anything outside that list falls back to standing still rather than reaching the canvas — which looks exactly like a title with no movement at all, so a test walks every shipped template and refuses a move the renderer does not implement, naming the clip and the word.
The countdown is the one generator whose picture depends on when it is asked for. It is painted once per whole second of the clip's own material — so a trimmed head skips the front of the count and a speed ramp stretches it — and the cache is keyed on the number standing on screen rather than on the instant, which is what keeps a text layout off every frame.
A slow push over a still
Slow push (Ken Burns) in a clip's context menu writes the move a photograph cannot make on its own: a fifth of a frame of scale over the whole clip, drifting a little off centre.
It writes keyframes, not a mode — two on the scale, two on the position, in one step of the history. That is the whole design decision: a "Ken Burns" switch would be a second way for a clip to move, resolved somewhere other than the core, and nobody could take half of it back. Four keys are an edit anybody can drag, retime, ease or delete like one they set by hand. The last key sits one flick inside the clip rather than at its end, because the end is exclusive and a key there is never asked for.
Fading the first clip up and the last one down
Fade in and out in the same menu writes four keys on the opacity: up over half a second at the head, down over half a second at the tail — or a quarter of the clip where the clip is shorter than two seconds, because a fade longer than the shot it is on never reaches full and reads as a picture that was never turned up.
A transition does this between two clips. This is for the two that have nothing to dissolve with: the first and the last.
Subtitles
Videola reads and writes SRT and WebVTT. Drop an .srt or a .vtt on the editor, or reach for Import captions in the project menu, and every cue becomes a clip on a caption track of its own. Export captions writes the track back out as an SRT beside the project.
A subtitle is an ordinary clip with a text generator in it, so everything the timeline can already do to a clip it can do to a subtitle: drag it, trim either edge, split it at the playhead. Two more things belong to captions in particular. Merge with next caption in the clip menu folds a subtitle into the one that follows it -- the words joined on their own lines, the span reaching from the first head to the second tail -- and it is one undo step, because a half-merged pair is not a state anyone asked to land on. And the Text panel in the inspector is where the words are typed. It is a textarea and not a single-line field: a hard line break is a line break on screen, and a two-line subtitle typed into an input comes back as one line.
Where the times live
The formats count in whole milliseconds and the project counts in flicks. 705 600 000 is a whole multiple of 1000, so a millisecond is exactly 705 600 flicks and neither direction loses anything. That conversion lives in millisecondsToTime and timeToMilliseconds in packages/core/src/commands.ts and nowhere else, and it is what lets the same file go in and come back out character for character -- which is checked, on a file whose milliseconds are none of them a whole second or a whole frame.
Only a caption track is read back out. That is the whole reason TrackKind::Caption exists rather than a convention on the text track: the builtin templates put lower thirds on text tracks, so a subtitle file written from every text clip in the project would carry the lower thirds as cues, and one written from some of them would need a second marking somewhere else to say which. A hidden caption track is left out of the file for the same reason it is left out of the picture.
What an SRT is allowed to be
A caption file is something you were handed, so every one of these is dropped on its own and the rest of the file is still read: a timestamp that will not parse, an end that does not come after its start, a cue with no words in it, a cue further out than a project may reach. Reading stops after 20 000 cues, which is ten times a three-hour feature. A file that is not a caption file at all yields nothing rather than an error. Markup is dropped -- the generator draws one run of text in one style, and the alternative is drawing the tag as characters.
How they look, and where they end up
The default is white on a translucent black plate, low and centred, in the style keys the text generator already reads. The plate is what makes it readable on a bright sky and on a night interior both -- a stroke alone survives one and not the other, and a stroke wide enough for both eats the counters of the letters. That claim is checked at pixels, over white and over near-black, against the same words with the plate taken away.
In the export dialog, captions go in the picture, as a separate track, or are left out. In the picture is the default and needs nothing of the player. A separate track is one the viewer can switch off; whether the chosen container can carry one is asked of the writer rather than assumed, and the control is greyed out where it cannot. Both containers Videola writes can carry WebVTT today.
Playback
The transport gives you start, frame back, play/pause, frame forward, end, and a timecode read from the project's frame rate. Space toggles playback and the arrow keys step frames; both listen on the window, so they work while the focus is in the timeline.
The audio clock leads and the picture follows, because audio drift is audible and a dropped frame is not. Frame rates stay rational to the last division — 30000/1001 is not 29.97, and a frame step built from the decimal drifts off the ruler within a few hundred frames.
Browsers start an AudioContext suspended and only allow it to resume after a user gesture, so the first press of play does slightly more work than the ones after it.
J, K and L
| Key | Result |
|---|---|
| J | rewinds; each press in the same direction steps up 1, 2, 4, 8 |
| K | halts |
| L | plays forward, up the same ladder |
A press against the direction of travel drops straight back to the first rung rather than counting back down, which is what makes tapping J out of a fast forward feel like a brake. The rate is shown beside the timecode while it is not the ordinary one, and the two triangle buttons do the same thing for a hand with no keyboard under it. A rewind ends at the head of the timeline and halts there.
This is the transport's rate and not a clip's. A clip's speed — including a ramp, which is a curve rather than a factor — is a property of the material and travels with it into the export; this one exists only while somebody is shuttling, and nothing in the project ever reads it.
Sound plays at ordinary speed and at no other. An AudioBufferSourceNode is scheduled against real time and cannot follow a shuttle, so the alternative is not fast audio but audio drifting further from the picture with every second — which is worse than none.
Preview resolution
The select beside the timecode draws the preview at 1/2 or 1/4 of the screen's own resolution. The element keeps its size and the browser stretches the smaller buffer back over it, so the picture only gets softer — the cheapest thing there is to trade for a preview that keeps up on a big project. The export never sees it: it renders into a context of its own, at the size the export dialogue was given.
On a phone
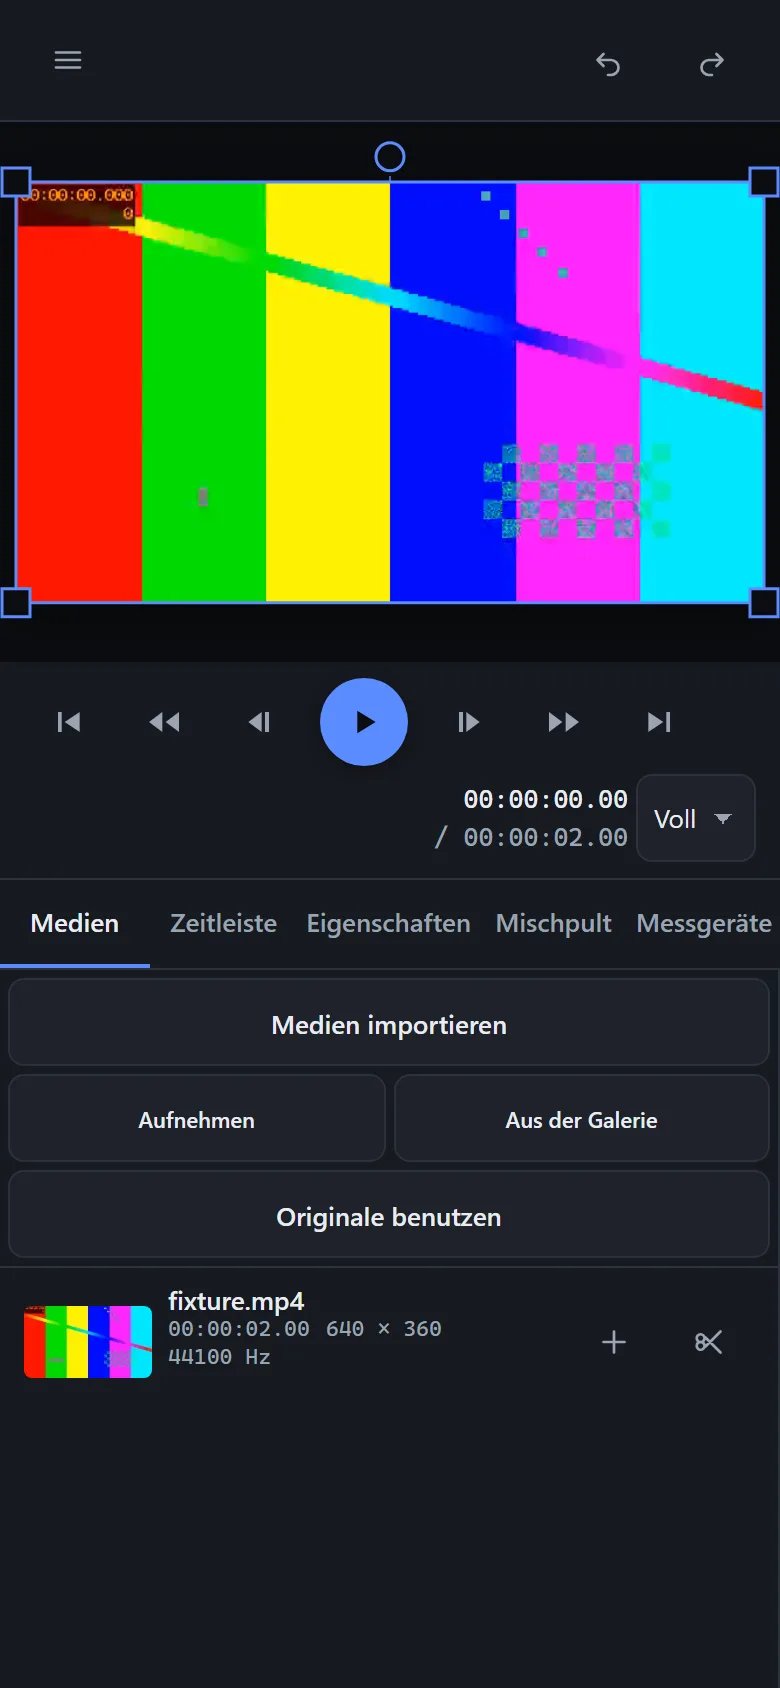
Below 768 px the editor switches to a single column: the preview and the transport stay at the top, and a tab bar underneath swaps between Media, Timeline and Properties. The picture has to stay visible while you work below it, and 390 px cannot hold a library, a preview and a timeline side by side without all three being useless.
Three tabs, not the six the design sketch names. Text, audio and export have no panel of their own; a tab that opens nothing is worse than a tab that is not there, and each one joins the bar on the day its panel does. Properties is the third because it carries effects, keyframes, transitions and speed — while it sat as a strip between the transport and the tab bar it had a third of the screen and still could not show a single effect, which made the phone a viewer rather than an editor.
The panel that is not showing is unmounted rather than hidden. The timeline windows its clips by the width it measures, and a display: none container measures zero — it would come back empty.
The same Pointer Events path carries mouse, pen and finger, and the touch targets are 44 px.
The header
The topbar carries ten controls, which do not fit 390 px at 44 px each. The project actions — new, template, open, import, add track, insert — live behind the ☰ disclosure at the left, and on a phone export, save and the language and theme switches join them. What stays on the bar is undo and redo, the two a thumb reaches for constantly.
It is a <details> element rather than a menu built by hand: the open state, the keyboard handling and the accessible name all come with it.
Before this the bar simply scrolled sideways. Every button stayed reachable in principle, and in its resting state half of them sat outside the window — "Import medi…" cut off at the right edge. No test saw it, because no test asked whether the bar fitted the window. One does now: at 390 px its scrollWidth must equal its clientWidth.
Camera and gallery
On a phone and a tablet the library offers Record and From the gallery beside Import media. Both are ordinary <input type="file" accept="video/*">; the first adds capture="environment", which is what asks a phone for its rear camera instead of its file system.
That attribute is the whole feature, and it is as far as verification goes: a headless browser has no camera and no gallery. The harness checks that the input is there with the right accept and capture, that it is a 44 px target, and nothing beyond that. What a real phone does with it has not been observed.
On a tablet
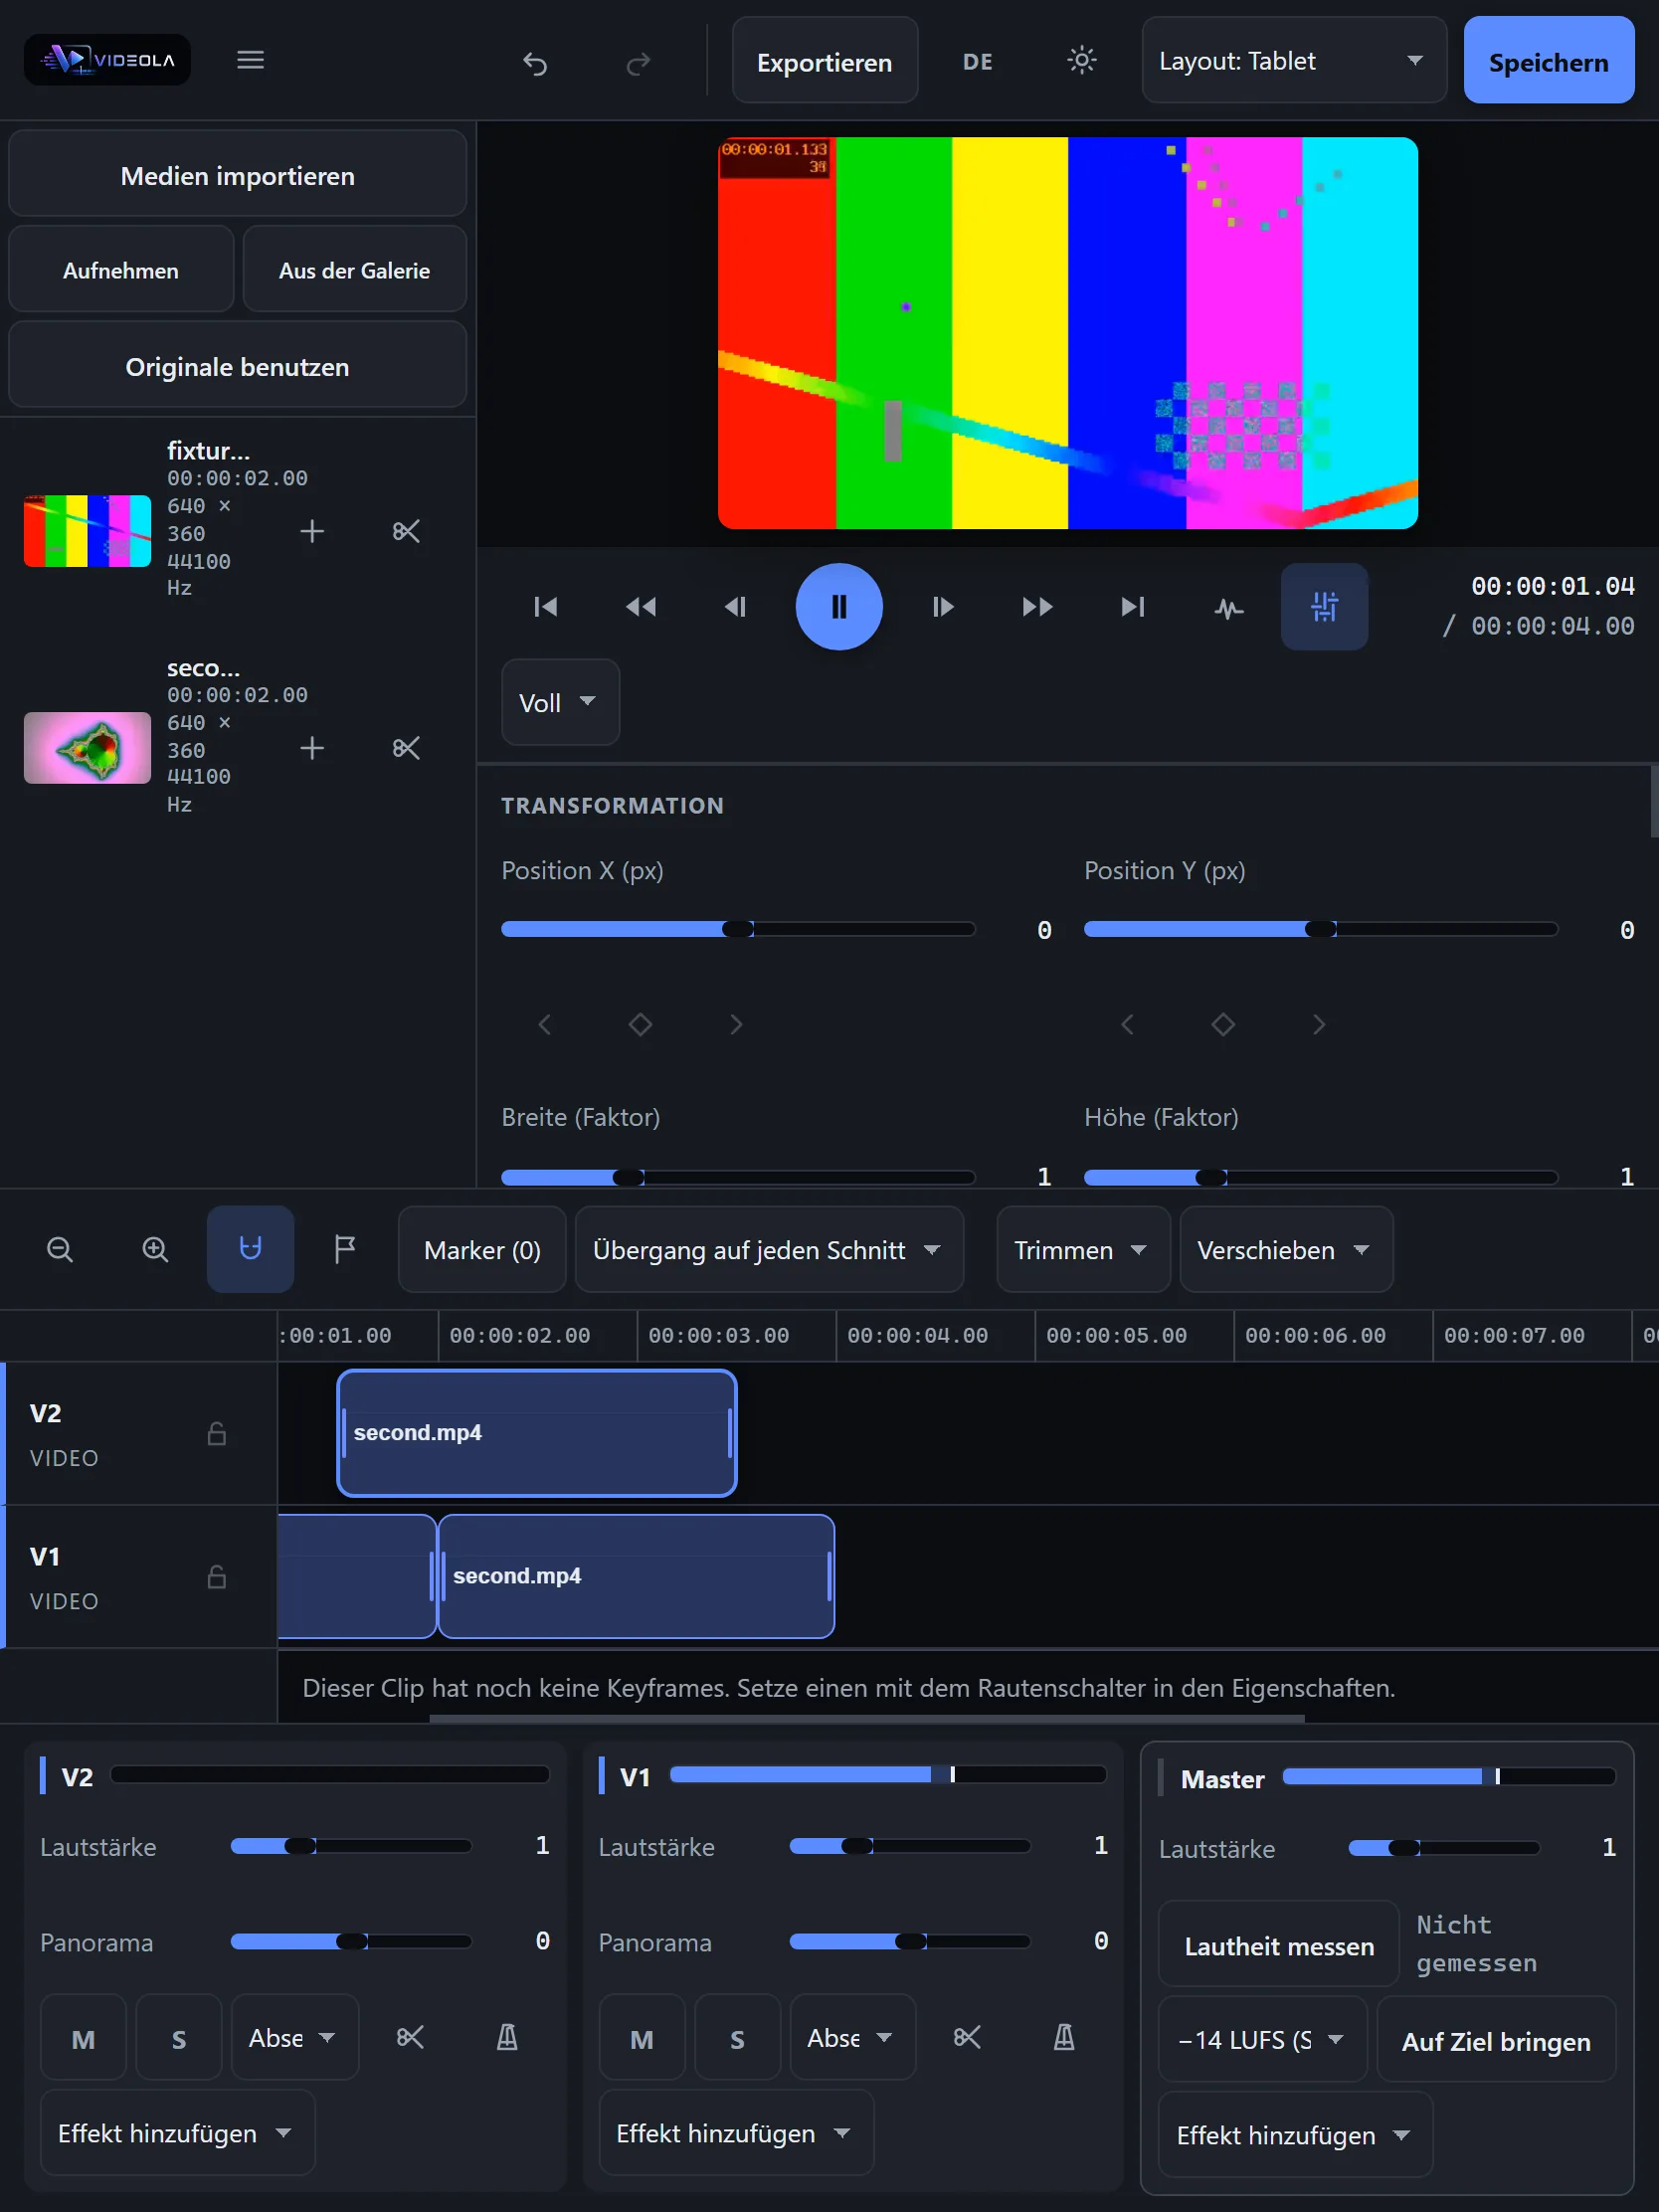
Between 768 px and 1280 px — and on anything without a fine pointer, whatever its width — the editor lays out in two columns: the media library down the left, the picture, the transport and the properties panel stacked on the right, and the timeline across the bottom.
Two columns rather than the desktop's three, because a portrait tablet is short of width and long on height. At 834 px, three panels side by side left the middle about 330 px — narrower than the transport itself, which cut the timecode off mid-digit.
The library and the timeline are on screen together, and that is the point of the mode: it is what lets you drag a medium out of the library onto a track, which a phone cannot offer because the two never show at the same time. Press an entry, carry it over the timeline — the target track lights up and a line shows where the clip would start — and let go. One command, so one undo step. The Add to timeline button stays as well: a drag is not keyboard-operable, and it is the only other way onto the timeline.
Saving
Save writes a .videola file: a ZIP holding a manifest, project.json and every referenced medium, each named after the hash of its own bytes. Open reads it back. The media come from OPFS, so a saved project carries its footage with it rather than pointing at paths on your machine.
The autosaved session
Every thirty seconds the editor writes the project state into browser storage on its own. Not a .videola: a snapshot every half minute that gathered, hashed and zipped every medium would be gigabytes of copying to remember where a clip sits. The media are in OPFS under their content hash already, which is where the renderer, the decoder and the export read them from, so a snapshot that names them is a snapshot that can be restored.
Open the editor after a crash and a banner offers the snapshot with the time it was taken. It is only offered, never taken: restoring over a tab somebody opened on purpose is the same surprise as losing the work, seen from the other side. Discard removes it.
An empty project is never written, so a fresh tab cannot overwrite the state it is still offering to restore. A snapshot half-written when the machine went down reads as no snapshot at all, and one whose project the loader would refuse is refused on the way back in as well — an autosave nobody asked for must not be the reason the editor will not start. A snapshot whose media have since left OPFS restores with the same "missing medium" banner an opened file would give.
What is verified, and what is not
The compositor is checked against real pixels in headless Chrome, the timeline and the inspector against real browser layout, the application itself against a real dropped video, and the export against ffprobe and ffmpeg — four harnesses that run without Playwright.
The keyframe chain is measured end to end in the last of those: brightness is put on the clip through the surface, two keyframes are set through the surface, and the drawing buffer is then read at three moments. Against the same three frames without the effect, the picture comes back at 0 at the first keyframe, at half in the middle and at the original brightness at the second — the interpolation is the core's, the pixels are the compositor's, and both halves run in one pass.
The phone layout is driven at a real 390×844 viewport at twice the pixel density, and the tablet at 834×1112, both over the devtools protocol with touch emulation on: Chrome on Windows refuses a window narrower than 500 CSS pixels and clips the screenshot instead of scaling it, so --window-size alone would have measured a small tablet and called it a phone. Import, a finger drag, undo, every tab, an effect put on a clip and playback are checked on the phone; on the tablet, two media on two tracks, the drag from the library onto a track, and that the picture, the transport and the panels each get a box inside the window. The screenshots above come out of those runs.
Thumbnails are checked as pictures, not as elements: the <img> must report a non-zero naturalWidth at 160×90, the two media in the tablet run must differ from each other, and a still must not be one flat colour — a placeholder, a black frame and a failed decode all fail that.
Not verified: lip-sync, because headless Chrome has no audio output; sustained frame rate at 1080p; what a real camera or gallery does with capture, because a headless browser has neither; pixel readback at phone size — the drawing buffer is gone once the page has composited it, and the phone run needs the wall clock for its layout to be trustworthy, so the screenshot is the evidence that the preview decodes there; and a transition set through the inspector has never been drawn, because a cross dissolve needs two overlapping clips over the same cut.